As you progress through the missions in order, you will find additional forces being introduced, such as Support Weapons and vehicles. Once you are experienced with the rules, you can roll a D6 on the Mission Table to choose which game you will play. Mission Table Roll Mission 1 The Patrol 2 The Probe 3 Attack and Defend 4 A Delaying Action 5 The Flank Attack 6 Attack on an Objective If you are keen to play historical scenarios, the terrain and the forces you will want to build and collect will be determined by real events and locations. However, even when creating your own scenarios, the six core Missions presented here will serve as a guide, applying, as they do, to warfare in all theatres, from Rangoon to Rostov and Rouen.
Of course, how you place your terrain will influence how the game is played out. Use the Mission notes to guide you. Place the objectives where they are required and then build terrain around that in a manner that reflects real life. The more your tabletop looks like reality, the more immersing and enjoyable the experience will be.
Houses do not stand alone, they have gardens or yards with fences, walls and hedges. Adding these will mean that your model troops will be fighting in an environment similar to their historical real-life counterparts. Use old photos of the region your game is set in to inform what terrain you add to your collection. You don't need everything immediately; building terrain is a fun part of the hobby and regularly adding one or two items to your collection will see you rapidly able to assemble interesting and challenging tabletop landscapes to fight across.
Winning a game by capturing an objective results in a major victory. Winning a game by reducing your opponents Force Morale to zero results in a minor victory. If playing a series of games against your opponent, a major victory is valued at three Victory Points, whereas a minor victory is just one Victory Point.
If the Objective Marker is captured, or re-captured, the opposing player will roll for a lost Objective Marker on each subsequent Turn End.
Once the Patrol Phase is ended, a Patrol Marker can be used as an Objective Marker. Alternatively, an Objective Marker can be modelled with appropriate scenery, such as ammunition boxes, fuel drums or similar.
The player initiating the Final Countdown places one or more dice with the total number of pips equal to their opponent's Force Morale. This is the number of phases that the Final Countdown will last.
Once the Final Countdown has been started, the number of Phases remaining is tracked, beginning with the next Phase. The number of pips on the dice are reduced by one at the end of each subsequent Phase played. Chain of Command Dice cannot be played to end the Turn.
During the Final Countdown, if either player rolls three or more 6's on their Command Dice, the game ends instantly with the player that controls the Objective winning the game.
If neither player rolls three or more 6's before the Final Countdown is completed, the game enters the Sudden Death stage, with play continuing until any Command Dice roll of two or more 6's occurs, ending the game instantly.
The Final Countdown does not replace the Force Morale mechanism. If either side is reduced to zero Force Morale during the Final Countdown or Sudden Death stage, the game ends.
Unless otherwise stated, the side with the higher Force Morale will make the first move in the Patrol Phase. In the event of both Force Morale levels being the same, the Attacker will make the first move.
Once the Patrol Phase is complete, the player who moved their Patrol Marker first now places the first Jump-Off Point on the table. The players take it in turns to place individual Jump-Off Points on the table until both have placed all of their Jump-Off Points. The Patrol Markers are then removed and the game itself can begin.
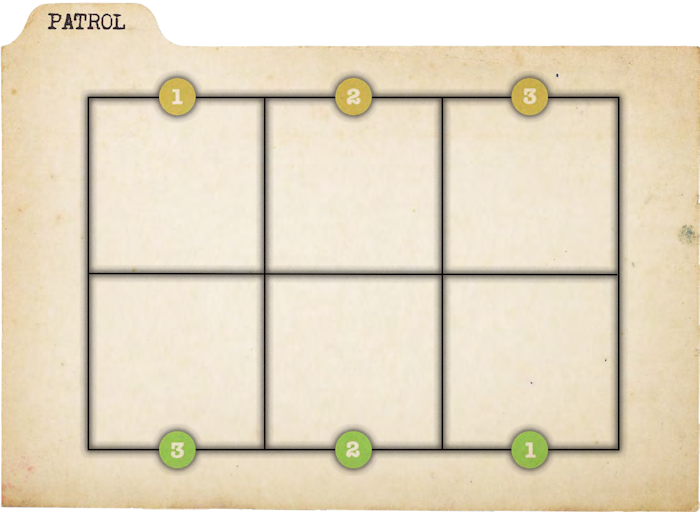
This Mission is the classic encounter in No-Man's-Land; your mission is to deny your opponent this critical ground between the main lines of defence. This is not a fight to the death, but the clash of patrols before a bigger action.
This Mission is always fought across the table, as shown.
The side with the higher Force Morale begins the Patrol Phase. If equal, roll a D6 each; the player with the higher roll making the first move. Each player chooses whether to use three or four Patrol Markers. At the end of the Patrol Phase, both sides place three Jump Off Points.
Both players start the game with 1D3 Chain of Command Points.
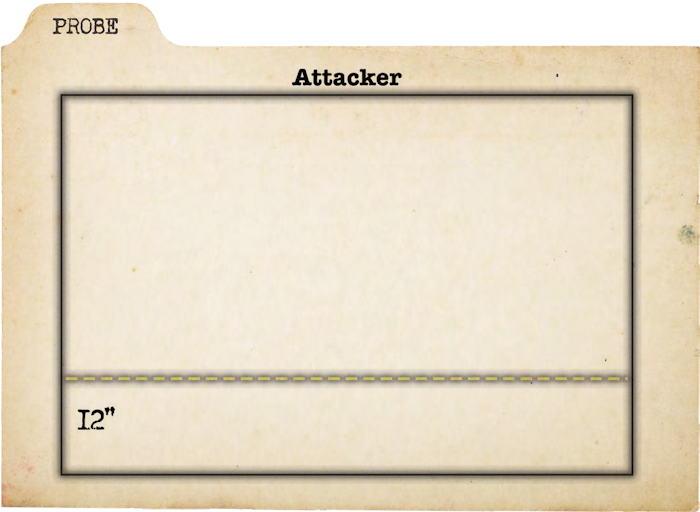
This Mission represents an Attacker attempting to identify and secure a route through the enemy's outpost line before reinforcements can arrive.
Roll a D6. On a roll of 1 to 3, this Mission is fought across the table, as shown. On a roll of 4 to 6, it is fought along the table length.
The side with the higher Force Morale begins the Patrol Phase. At the end of the Patrol Phase, both sides place three Jump Off Points. The Defender may not place any Jump Off points behind their dashed line. Where no cover is available, place the Jump Off Point on the dashed line in the open.
If the Defender can end the game before the Attacker achieves their objectives, they win the Mission. The Defender does this by ending two Turns using six Chain of Command points. The second Turn ended in this way begins the Final Countdown. See Section 19.4.
The Defender may use their Chain of Command points as normal; however, whenever they accumulate a full Chain of Command Dice, these must be used to end the Turn at the end of the current Phase of play.
The Attacker start the game with 1D3 Chain of Command Points.
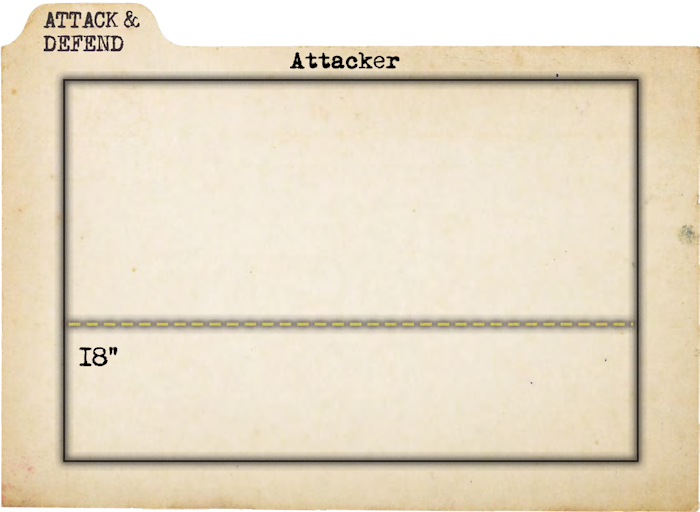
This is a major attack on a known enemy position in their main line of defence, with a view to capturing a specific geographical objective.
Roll a D6. On a roll of 1 to 3, this Mission is fought across the table, as shown. On a roll of 4 to 6, it is fought along the table length.
The Defender places two Objectives on the table, 18" from their friendly table edge. These must be a minimum of 18" apart and 12" from the any table edge. A significant feature, such as a building, road, high ground or bridge should be at these points.
Either side may initiate the Final Countdown in this Mission once an Objective Marker has been captured by the Attacker.
The side with the higher Force Morale begins the Patrol Phase. If equal, the Attacker takes the first move. At the end of the Patrol Phase, both sides place three Jump Off Points.
The Attacker starts the game with 1D3 Chain of Command Points.
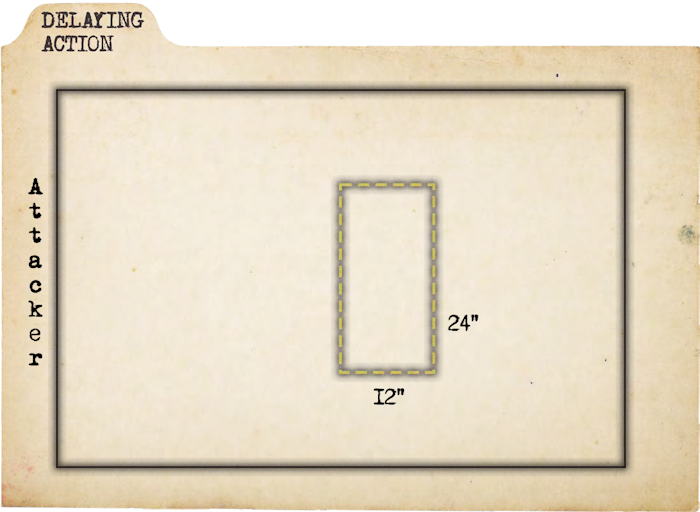
In this Mission a disordered Defender is attempting to blunt the advance of a stronger Attacker that is seeking to break through their position.
This Mission must be played along the table, lengthways, as shown.
Both The Ticking Clock and Final Countdown are available in this Mission. If the Defender holds the Objective at the end of the Second Turn, they may begin the Final Countdown.
The Attacker rolls 1D6. On a roll of 1 or 2, they take one move before the Patrol Phase begins. On 3 to 6, they take two moves. The side with the higher Force Morale begins the Patrol Phase.
Once the Patrol Phase ends, the Jump-Off Points are deployed, the Defender placing two, the Attacker three. The Defender then places a third Jump-Off Point anywhere they wish in the boxed area. This Jump Off Point is also the Objective Marker for the game. This may not be moved during play.
The Defender may not select Engineering support choices, shown in blue. Neither side can select Mortars, shown in grey.
The Attacker starts the game with 1D3 Chain of Command Points.

This Mission represents the breakout phase of battle where one side, having broken through the enemy defences, is making a flank attack against an important enemy position.
Both The Ticking Clock and Final Countdown are available in this Mission. If the Defender reduces the Attacker's Force Morale so that they lose one or more Command Dice, the Defender may begin the Final Countdown.
The Attacker places two separate groups of three Patrol Markers along their two edges, all within 12" of at least one other friendly Patrol Marker in their group. These two groups move separately and do not need to be within 12" of the Patrol Markers in the other group.
The Attacker begins the Patrol Phase. Once the Patrol Phase ends, both the Attacker and Defender place three Jump-Off Points on the table.
The Attacker starts the game with 1D3 Chain of Command Points.
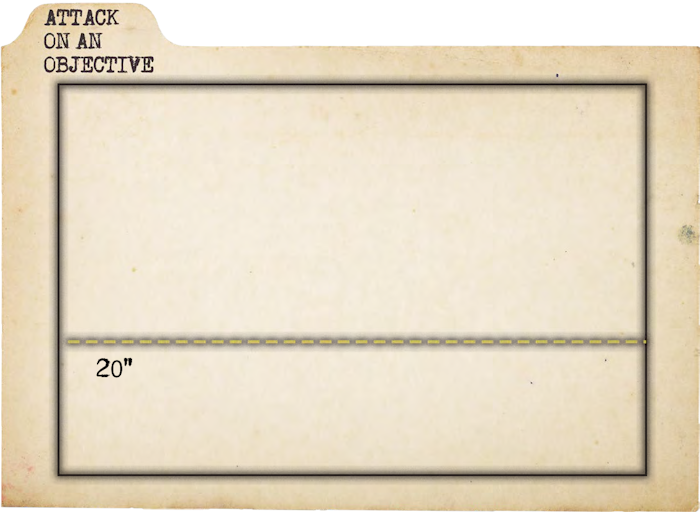
This Mission represents the attack on the ultimate objective, the final Phase of battle.
Roll a D6. On a roll of 1 to 3, this Mission is fought across the table, as shown. On a roll of 4 to 6, it is fought along the table length.
The side which holds the Objective Marker at the end of the game wins. If one side sees their Force Morale reduced to zero, they quit the field and lose the game, irrespective of the ownership of the Objective Marker. Either side may initiate the Final Countdown once the Attacker has captured the Objective.
If the game is fought along the length of the table, the Attacker rolls 1D6 before the game begins. On a roll of 1 to 3, they take one move with their Patrol Markers. On a. Roll of 4 to 6, they take two moves.
The side with the higher Force Morale begins the Patrol Phase. At the end of the Patrol Phase, both the Attacker and Defender place three Jump-Off Points on the table.
Both sides start the game with 1D3 Chain of Command Points.